NormOwn
Garlic Balls – 185 more

These tasty little morsels go great with any pasta dish, soup or stew. At about 50 calories and less than 1 gram of fat each, you can enjoy a couple without guilt. Compare that to one breadstick from Olive garden at 150 calories and 2.5 grams of fat each and you could actually eat 3 of these to one of those!
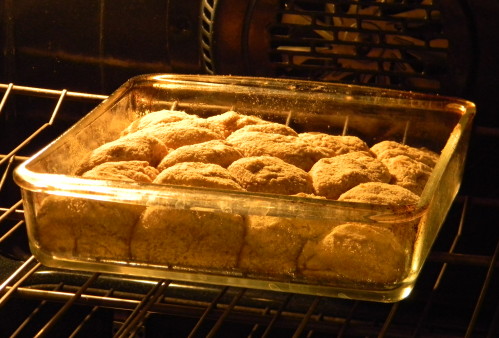
Garlic Balls
2 cups whole wheat baking mix (click here to see my favorite one from Hodgson Mills)
2 Tablespoons Smart Balance Butter Spread, cold
1 cup skim milk
whole wheat flour
fat-free butter spray
1/2 teaspoon garlic powder
1/3 cup low-fat Parmesan cheese
Preheat oven to 425°. Coat a 9″ x 9″ baking pan with non-fat cooking spray.
Place garlic powder and Parmesan cheese into a small bowl and mix.
Put baking mix into a large bowl, add Smart Balance. Use a pastry blender (or two knives) and cut Smart Balance into the baking mix. Pour in about 2/3 of the skim milk and mix (adding the rest of the milk slowly) until a soft dough forms. You may need to add a little whole wheat flour to get a dough consistency that you can work with using your hands. Place dough on a lightly floured board and form into a large square (about 9″ x 9″). Cut dough into 18 equal pieces, roll each into a ball. Spray each ball lightly with fat-free butter spray, then roll ball into garlic/cheese mix. Place, sides touching, into baking pan. Bake 20 – 25 minutes until golden brown.
Normand Family Granola – 186

As I’ve mentioned before, Eric and I work on a country music tour. This involves long trips on a tour bus and, for most, eating in truck stops, restaurants, and catering. Since we don’t “believe” in restaurants (I know that probably sounds strange, but more about that in another post), we always bring all of our own food on these trips. For the most part, we get a lot of funny looks when we elect to take a walk around a restaurant parking lot (instead of going in and ordering a meal) and then heating up our own food on the bus once we are rolling again. The one item that we bring that is always a huge hit (we’ve actually taken to hiding the bag at times) is our home made granola. So here is the very sought after recipe…now make your own!
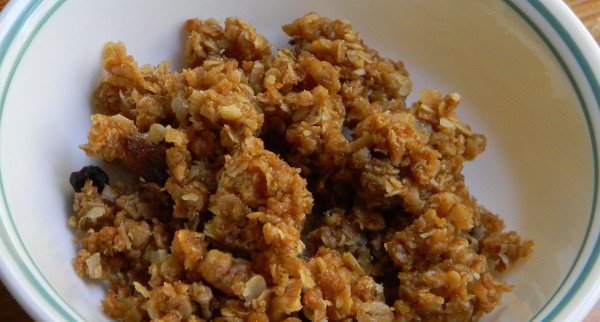
Normand Family Granola
4 ½ cups instant oats
1 cup wheat germ
2/3 cup brown sugar
1 cup nonfat dry milk
¾ cup chopped walnuts
¾ cup chopped almonds
1 ½ Tablespoons cinnamon
2/3 cup honey
1/3 cup canola oil
1 ½ teaspoons vanilla
1 cup raisins
Preheat oven to 325°. Spray large roasting pan with non-stick spray. Combine first seven ingredients; mix well. In small saucepan, combine honey and oil; heat gently to dissolve honey, remove from heat and add vanilla. Pour honey-oil into the dry ingredients, stirring well to thoroughly coat and mix – this is a critical step, be sure that the mixture is completely blended. Bake for 20 to 25 minutes or until toasted to your liking. As it bakes, stir every 5 minutes. Let cool slightly, then add raisins. Cool completely before storing in an airtight container.
Variations:
Add ¾ cup chopped pecans (or include any combination of nuts that you like)
Replace honey with maple syrup
Use half honey and half molasses
Add 1 ½ cups chopped dried apples
Substitute dried cranberries for the raisins
This granola is great all by itself, as a snack, or with milk, or yogurt; Eric likes a bowl of fruit with fat free vanilla yogurt and granola on top. A special treat is to sprinkle some over fat-free, sugar-free french vanilla frozen yogurt while the granola is still warm from the oven 😯
Honey Mustard Chicken & Rice – 187 to go…

I’m in a bind, I’m way behind, I’m looking to make a meal….that was bad 😈 But, I have to admit I am getting behind in my quest for 200 recipes in 400 days. A few Rhett shows and an amazing birthday vacation to Clarksdale, Mississippi have contributed to my slippage. Check out Eric’s blog, with photos, here – it’s actually a series of blogs. I am determined to reach my goal, so I am going to have to step it up!
Last night my plan was to make breaded chicken strips with a honey mustard dipping sauce (which is also a great recipe that I will add at a later date). My wonderful prep cook began chopping veggies and the chicken while listening to some blues albums. Just as he started chopping, the phone rang; it was my sister, Donna. I hadn’t talked with her since before my vacation so I took the phone in the other room and chatted for quite a while. I told her all about our awesome vacation and she told me about my great-niece’s wedding which she had attended over the weekend. After about a half hour, Eric popped his head in the door of my office to let me know that the prep was done and ready for me. I said goodbye to Donna and headed for the kitchen. Unfortunately, Eric had been paying more attention to the music he was listening to than to my prep instructions. He had given me chicken cubes instead of strips. So a quick reassessment of dinner plans was in order. I looked over a few recipe ideas I had been toying with and came up with this. I hope you all like it as much as we did!
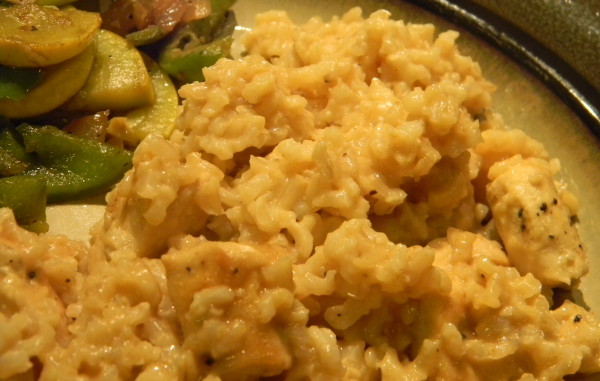
Honey Mustard Chicken & Rice
1 pound boneless skinless chicken breast, cut into cubes
2 teaspoons olive oil
1/4 teaspoon black pepper
1/2 teaspoon garlic powder
1/4 teaspoon onion powder
1/4 teaspoon paprika
1/8 teaspoon cayenne pepper
3 Tablespoons honey
3 Tablespoons Dijon mustard
3 Tablespoons plain fat-free yogurt
2 bags Success brown rice, cooked according to package directions
Heat olive oil over medium-high heat in skillet; add chicken. Saute chicken for 2 – 3 minutes; season with pepper, garlic powder, onion powder, paprika and cayenne. Continue sauteing until chicken is nicely browned and cooked through. Push chicken to the outside edges of the skillet; add the honey and mustard to the center and mix together until blended, then start mixing in the chicken from the edges. When completely blended, cook over very low heat for 2 – 3 minutes. Add yogurt and mix; cook just long enough to heat the yogurt and blend the flavors. Mix in the cooked rice and enjoy!
Tiramisu Pie – 188 to go!

Some of you may think that there shouldn’t be desserts on a “healthy” recipe blog. But I disagree. Eating healthy is about moderation and making the right choices. I don’t recommend this dessert for a weekly event, but it’s one of my favorite things to make for our annual Christmas party. For eight servings, it’s around 300 calories and less than a gram of fat per serving, there is a fair amount of sugar…but, it’s a dessert and not to be eaten daily! Compared that to the Olive Garden version which will cost you 1,000 calories per serving!
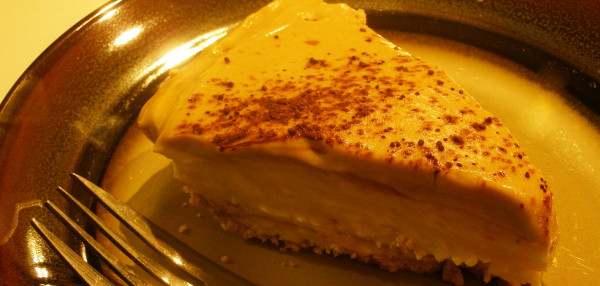
Tiramisu Pie
1 graham cracker pie crust
Graham Cracker Crust
1 – 1/2 cups graham cracker crumbs
3 Tablespoons vanilla fat-free yogurt
2 Tablespoons brown sugarPreheat oven to 350°. In a medium bowl, mix together graham cracker crumbs, yogurt, and brown sugar. Press mixture firmly into a 9 inch pie pan. Bake in preheated oven for 5 minutes.
water
1 – 14 oz. can fat-free sweetened condensed milk
2 – 1.5 oz. package sugar-free, fat-free vanilla instant pudding mix
1 – 8 oz. block fat-free cream cheese
1 – 8 oz. tub fat-free whipped topping
1 Tablespoon instant coffee granules
1 Tablespoon Cocoa
Combine 1 cup cold water, milk and 1 package of the pudding mix in a large bowl; stir well with a whisk. Cover with plastic wrap; chill for at least 30 minutes, or until firm. Remove the plastic wrap, add cream cheese. Beat with a mixer at medium speed until well blended. Gently fold in 1/2 the whipped topping. Spread mixture in the prepared, cooled pie crust.
Heat 1/2 cup of water to very hot, add instant coffee; mix well. Add in more cold water and ice, to make 2 cups of cold coffee. Mix cold coffee with remaining package of pudding in a medium bowl. Mix well, cover with plastic wrap and refrigerate for at least 30 minutes. Remove plastic wrap and gently fold in the remaining whipped topping. Spread over the vanilla layer in the pie crust. Dust with Cocoa. Chill for at 8 hours. Indulge yourself and enjoy…..you might want to do a double P90X workout the next day 🙂
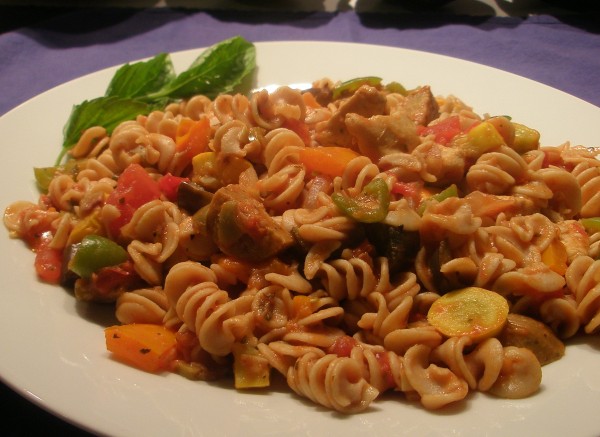
Pasta Mediterranean – down to 189!

One Saturday morning, last year, Eric was driving home from doing some errands and he stopped at a small farm stand on the side of the road. They had a great selection of vegetables grown on their organic farm just a few miles from our home. Eric started talking with Buddy (who, it turned out, owns the family run farm) and the subject of websites came up in the conversation. Since I own a website design company and Eric is the best marketing director in the world (among his many other talents) he told Buddy that we could design a great site for them and suggested that a barter could benefit all parties involved. We provide a website, they provide the vegetables.
I was at home when all of this happened and had no idea that I had just been volunteered for this project. However; once I saw all the beautiful, organic veggies that were going to be coming my way as “payment”, I was happy to do it.
This time of year, we get a lot of peppers, zucchini, summer squash, and eggplant. My Pasta Mediterranean is the perfect use for these fresh organic wonders!
Pasta Mediterranean
1 Tablespoon Olive Oil
1 lb. boneless, skinless chicken breasts, cut into bite size pieces
1 red pepper, diced
1 green pepper, diced
1 orange pepper, diced
1 eggplant, diced
1 zucchini, diced
1 summer squash, diced
1 cup mushrooms, sliced
1/2 cup onion, diced
3 cloves garlic, minced
1 – 1/2 teaspoon fresh basil, minced
1 teaspoon fresh oregano, minced
1/4 teaspoon black pepper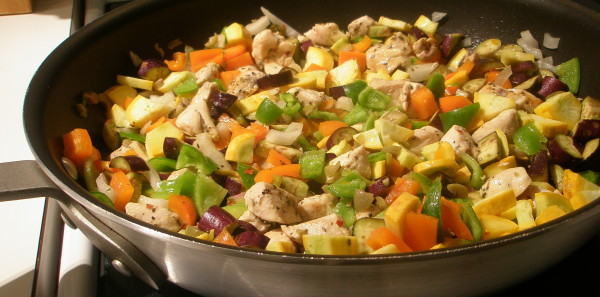
1/2 teaspoon cayenne pepper
1/4 teaspoon thyme
1/4 teaspoon crushed red pepper flakes
6 pitted Kalamata olives, chopped
4 oz. feta cheese, crumbled
2 – 15 oz. cans, no salt added, diced tomatoes
1 – 8 oz. can, no salt added, tomato sauce
2 links of Tofurkey Italian sausage, cut in half lengthwise, then chopped
1 – 16 oz. package whole wheat pasta
Start cooking the pasta, according to package directions (omitting the salt). As soon as you put the pot on to boil the water, heat the olive oil in a large frying pan and saute the chicken until lightly browned and cooked through. Remove from pan and keep warm. Add the vegetables (this combination of vegetables can vary depending on what looks good at your local farm stand or supermarket), season with the basil, oregano, pepper, cayenne, thyme, and red pepper flakes, saute until slightly softened. Add the olives and feta cheese; continue cooking until the feta starts to melt. Add the cooked chicken, diced tomatoes, and tomato sauce. Let cook for a few more minutes (until your pasta is almost done); add the Tofurkey, continue cooking until the Tofurkey is warmed through.
Drain the pasta, and mix it well with the veggies and sauce. Serve topped with grated Parmesan cheese.
P90X Round One – Done!
We finished our first FULL round of P90X last Friday, September 10th! (As this was a joint effort, this will be a two-part blog, the first part by Kelly, and the second part by Eric.)
Kelly writes:
We had previously attempted this three times and each time something (life, basically) got in the way and we didn’t make it all the way through. This time when we started, we made a pact with each other and said “No matter what, everyday, we are going to put on our workout clothes, put in the DVD, press play, and stand in front of that TV”. There were many days that it was really hard. There were many days that I thought I was going to do nothing but march in place and watch, but I didn’t. Once the music started and Tony started talking, I started feeling like maybe I could at least modify the workout and do most of it. Then the workout would start and there was Eric, right beside me, working hard; well I couldn’t let him progress faster than me….if he could do it…I could do it. That’s how we made it. We encouraged each other, we pushed each other, we did it together.
When I did the fitness test the first time, I could do 1/4 of a pull up. Actually that’s being generous, basically I could hang on the pull up bar. Last week – I did 10! During a chest and back workout a couple of weeks ago I did 127 full pushups, through the course of the entire workout. I’ve accomplished things I never thought I could. It’s one of the best feelings in the world.
Eric writes:
Like Kelly said, it took four attempts to complete this mother of all workouts, as our first three tries fell short. But we don’t consider those first three attempts a wasted effort. Even though we only made it just past day 60 on those earlier attempts, we still got a feel for the workouts, became familiar with the different moves, and became more instilled with the basic desire to succeed in this endeavor. Those first three attempts were all part of the process and ultimately building blocks in our new mindset of extreme fitness.
That being said, the feeling of actually completing the 90 day program is extremely rewarding. It was really hard, I mean really, really hard. But now that it’s over, we can’t wait to do it again. The improvements we have made regarding cardio, strength, and flexibility are massive.
One of the most exciting parts of this whole experience was taking the recommended P90X fitness test yesterday to measure our gains. This fitness test is performed at the beginning and end of the 90 day workout series and is essentially an extreme workout itself, consisting of 8 exercises; pull-ups, vertical leap, pushups, toe touch, wall squat, bicep curls, in and outs (crunches), and 2 minutes of jumping jacks after witch you measure your heart rate 5 times at 1 minute intervals. (If your feeling adventurous, download this free test and give it a try.)
We began by doing a warm up consisting of a 20 minute walk, followed by some running in place, jumping jacks and a combination of static and ballistic stretching. Then we put on AC/DC’s Back in Black (on vinyl) to provide some extra motivation.
Kelly went first, doing 12 pull ups! A year ago she couldn’t even do one. I followed with 18 pull ups (a year ago I could only do 4). Another standout was Kelly going from 23 pushups at the beginning of this round to 35, I went from 30 pushups to 50. As a senior in high school my record was 60, and it is my goal to surpass that number by next July when I attend the 25th reunion of my graduating class.
Kelly and Eric both write:
Why did we find it necessary to do such an extreme workout program? Because our lives depend on it! When we were teenagers, or even in our 20s our bodies seemed invincible. As we entered our 30s, we began to notice some occasional aches and pains. Now, into what some would call “middle-age”, stuff just plain hurts sometimes. Backaches, neck aches, tendinitis flare ups – I’m not saying we hurt every minute of every day, but the writing is on the wall. As we are not big fans of doctors or pharmaceuticals, it seems that only extreme measures will work to combat the effects of aging. So we minimize the aches and pains that everyday life delivers by making ourselves stronger. And this P90X program will definitely make you stronger. Of course exercise is only one half of the equation, the other half of the big picture for us is healthy eating.
P90X is just one of many great workouts in the Beachbody program. You can go even more extreme than P90X and try Insanity…we haven’t tried that yet, but hope to, after we finish another P90X round. There are also so many other programs that we think just about anyone could find one that fits; things like “Brazil Butt Lift”, “10-Minute Trainer”, “Hip Hop Abs”, “Body Gospel” and many more. Beachbody is also a great community. We have met so many great people and made friends from all over the world that are doing these same workouts and have the same goals of a fit, healthy life.
We plan to start another round of P90X on Tuesday, October 12, and would love for some of our friends to join us in this endeavor. Anybody up for the challenge? If you are, send us a note and we can take this virtual challenge together.
“Decide, Commit, Succeed!” – Tony Horton
Out with the Corn – In with the Garlic!
You will notice that the background image for this blog (and the main website) has changed. Why, you may ask? About a week ago someone recommend that I check out a website about a documentary called “King Corn“; which is about “two friends, one acre of corn, and the subsidized crop that drives our fast-food nation”.
I took a look at the website for this film and found some fascinating information. In looking all around the site, I found a link to four different commercials, two put out by the Corn Refiners Association (part of a $25 Million campaign to defend HFCS) and two spoofs by the makers of this film (one of them is below).
At the end of the commercials from the CRA there is a website link to a site called sweetsurprise.com. I was shocked at what I saw….there was the pretty image that I had been using for my background. I found that image quite a long time ago on a site with royalty-free images and I had been really pleased with the way it fit with this website….BUT, I do not want to be associated in any, even small, way with High Fructose Corn Syrup….SO…since there is more than enough corn in everything these days, it does not need to be in my website…the background had to go.
I have replaced it with a great photo of a garlic flower! I never even knew what a garlic flower looked like, but now I do. Garlic is something I’m proud to promote.
So there is my very long winded explanation! Out with the Corn – In with the Garlic!
Guilt Free Chips & Dip – 190 more!

Since today is the first Sunday of football season, I thought a snack recipe was needed. What is football without chips & dip? Anyone that knows me knows that I have a serious chip addiction (which I am working on 🙂 ), so If this satisfies my craving I think it will work for you too!
Guilt Free Onion Dip
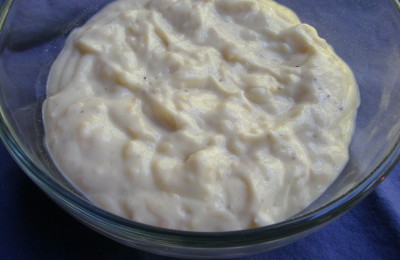
1 teaspoon sodium free beef bouillon granules
2 teaspoons dried onion flakes
1/4 teaspoon onion powder
1/8 teaspoon garlic powder
1/8 teaspoon black pepper
2 cups plain low fat Greek yogurt
Mix all ingredients together well and chill in refrigerator for at least one hour.
Pita Chips
4 – 6″ whole wheat pita breads
cooking spray
olive oil spray
coarse salt
Preheat oven to 425°. Cut each pita into 6 wedges; separate each wedge in half. Place wedges, in a single layer, on a cookie sheet that has been sprayed with cooking spray. Spray a light coating of olive oil over the pitas and sprinkle very lightly with coarse salt. Bake for 4 – 6 minutes, depending on your oven. These need to be watched very carefully – you want them golden brown and crisp; and the difference between that and black and charred can be a matter of seconds!
Banana Nut Muffins – 191 more!
 Banana Nut Muffins
1 cup whole wheat flour
1 cup whole wheat pastry flour
1 teaspoon baking powder
1 teaspoon baking soda
1/2 cup Smart Balance Light Spread
3/4 cup brown sugar
1/4 cup egg substitute (equal to 1 egg)
1 – 1/4 cups mashed banana (approximate 2-3)
1/4 cup vanilla fat-free yogurt
1/2 cup chopped walnuts
Preheat oven to 350°
Sift flours with baking powder and baking soda onto wax paper. Beet Smart Balance, brown sugar, and egg substitute into a large bowl until smooth. Add bananas and yogurt; beat again (mixture will appear curdled). Add flour mixture and chopped nuts; mix just until well blended.
Pour equally into 12 muffin tins that have been sprayed with cooking spray. Bake in preheated oven for 25 – 30 minutes or until the tops spring back with lightly touched. Turn out onto cooling racks.

Grilled Swordfish or Tuna Steaks – down to 192!

Grilled Swordfish or Tuna Steaks
3 Tablespoons low-sodium soy sauce
1 Tablespoon Worcestershire sauce
1 teaspoon spicy mustard
1/4 teaspoon ground ginger
2 teaspoons olive oil
Swordfish or Tuna Steaks
Combine first 5 ingredients into a shallow bowl or plat (large enough to hold the steaks). Place steaks into the marinade; turning to cover well. Cover and allow to marinate for 30 minutes (or longer).
Broil (or grill) steaks for 3-4 minutes per side, depending on the thickness of the steak.