Kelly
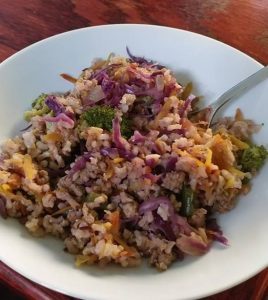
Egg Roll in a Bowl

2 bags (or 4 cups cooked) brown rice (I use the boil in bag brown rice)
1 lb. ground turkey (you could use beef or chicken or pork as well)
1 medium onion, sliced
1 medium pepper (green, red, yellow or whatever color you like – or mix it up!), chopped
1 cup broccoli florets
1 1/2 Tablespoons sesame oil
4 cloves garlic, minced
1 cup shredded carrots
1 1/2 teaspoons ground ginger
1/2 teaspoon crushed red pepper (more if you like it more spicy)
1/3 cup low sodium chicken broth
3 cups (approximately) shredded cabbage
1/4 cup low sodium soy sauce
Cook rice according to package directions. You can do this in advance or while you are cooking the rest of the dish.
Place ground meat in a large pan (I use a wok for this) and brown lightly on medium-high heat. Add the onions, peppers, and broccoli and stir fry until the veggies are done almost to your liking. Add the minced garlic, carrots, ginger, and crushed red pepper and saute for another minute or so; add the chicken broth, stir well. Add the cabbage and cook until the cabbage is slightly wilted. Add the soy sauce and rice; mix well and enjoy!
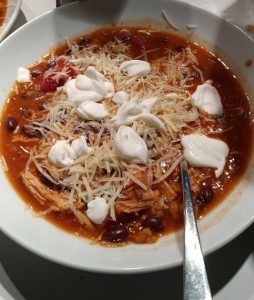
Slow Cooker Chicken Enchilada Soup

This crock pot meal takes bout 10 minutes of prep time and the incredible smell all day will drive you crazy! It’s easy, nutritious, and makes at least 8 servings at less than 300 calories per bowl…of course, that depends on what you like to put on top – some ideas are, diced avocado, raw onions, shredded cheese, sour cream (or plain Greek yogurt), tortilla strips, or crushed corn chips…..
Slow Cooker Chicken Enchilada Soup
2 boneless, skinless chicken breasts (about 1 pound)
1 1/2 cups low-sodium chicken stock
1 /14 cups red enchilada sauce (store bought – or even better try the recipe below – very easy, healthy, and less expensive!)
1 – 14 oz can diced tomatoes
2 – 14 oz cans black beans, rinsed and drained
1 – 15 oz can creamed corn, no salt added
1 – 4 oz can diced green chilies
2 cloves garlic, minced
1 small onion, diced
1 teaspoon ground cumin
Add all ingredients – except chicken breasts – to a your crock pot; mix well. Submerge chicken breasts into the soup. Cover and cook for 6 – 8 hours on low. About a half hour or so before you are ready to eat, remove the chicken from the crock pot and use two forks to shred it; add it back to the soup, stir to combine, and let it cook for another half hour.
Homemade Red Enchilada Sauce
1 chipotle pepper, plus 1 Tablespoon of the adobo sauce (the stuff the chipotle come packed in)
3 cups chicken or vegetable stock, low sodium
3 Tablespoons olive oil
3 Tablespoons whole wheat flour
1 – 8 oz can tomato sauce, no salt added
4 Tablespoons chili powder
3/4 teaspoon garlic powder
1/2 teaspoon cumin powder
1/2 teaspoon dried oregano
1/2 teaspoon onion powder
Combine the chipolte pepper, adobo sauce, and 1/2 cup of chicken stock in a blender or food processor. Blend until completely smooth, with no solids remaining.
Heat the oil in a medium saucepan over medium-high heat. Add the four and whisk for 1 minute (being careful no to let it stick to the bottom). Add the tomato sauce, chili powder, garlic powder, cumin, oregano, and onion powder. Continue to whisk and add in the chipolte pepper mixture. Once the everything is totally combined and smooth; add in the chicken stock 1/2 cup at a time; whisking continuously to make sure you don’t get any lumps. Keep whisking until the sauce is just thick enough to coat the back of a spoon. Remove from heat. You can use this immediately or let it cool and refrigerate it or freeze it.
This recipe makes almost exactly enough for 3 batches of the Enchilada Soup recipe above. I usually make this and use one serving for the soup and then freeze the rest in two equal portions – so the next time I want to make this soup, I just grab one from the freezer and I’m good to go!
Turkey Bar-B-Q – Slow Cooker


1 – 1/2 lb. turkey tenderloin
1 cup ketchup
1/4 cup brown sugar
2 teaspoons garlic powder
1/2 cup diced onion
1/4 teaspoon thyme
1/2 teaspoon salt-free lemon pepper seasoning
2 Tablespoons Worcestershire sauce
2 teaspoons Dijon mustard
1/2 cup low-sodium chicken broth (you can substitute water, if desired)
Spray the insert of the slow cooker with non-stick cooking spray. Place the tenderloin in the bottom in a single layer. Combine the remaining ingredients together in a small bowl and mix well; pour sauce over turkey. Cover and cook on low for 7 – 8 hours. About a half hour before it is ready, remove the cover and shred the turkey with a large spoon or 2 forks; replace the cover and cook for an additional 30 minutes.
This is great on toasted whole wheat buns or even served over whole wheat noodles!
Variations:
You can substitute boneless, skinless chicken breasts or pork tenderloin for the turkey.
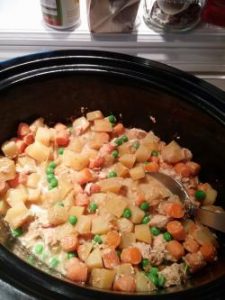
Slow Cooker Chicken Stew

Slow Cooker Chicken Stew
1 lb. boneless, skinless chicken breast, cut into cubes
2 cups potatoes, cubed (I use either red or Yukon gold and do not peel them)
2 cups carrots, sliced (I use baby carrots and quarter them)
½ Tablespoon olive oil
½ cup onion, chopped
1 teaspoon garlic, minced
2 Tablespoons butter (I use Smart Balance Light with Flax)
2 Tablespoons whole wheat flour
2 cups skim milk
1 ¼ teaspoons poultry seasoning – divided (I use Bell Seasoning)
1 cup frozen peas
Spray a slow cooker with non-stick cooking spray. Place chicken, potatoes, and carrots into the slow cooker; sprinkle with ¼ teaspoon of the poultry seasoning. In a medium sauté pan over medium-low heat, add the olive oil and onions; saute for about 5 miinutes and then add the garlic and saute for another 1 – 2 minutes. Add the onion mixutre to the chicken and veggies. Turn up the heat under the pan to medium and add the butter. When the butter is mostly melted sprinkle in the flour and 1 teaspoon of poultry seasoning; using a wire whisk, mix well. You will have what looks like crumbs in the pan. Let this cook for about 2 minutes, keeping everything moving and letting the pan get fairly hot. Start adding the milk a little at a time, whisking well after each addition and making sure everything is smooth; letting the pan heat back up again before adding the next milk addition (this will help the sauce stay smooth and lump free). Pour this sauce over the chicken and veggies and mix well.
Cover, and cook on low for 7 – 8 hours. At approximately 7 ½ hours add the frozen peas, replace the lid and continue cooking for 30 minutes.
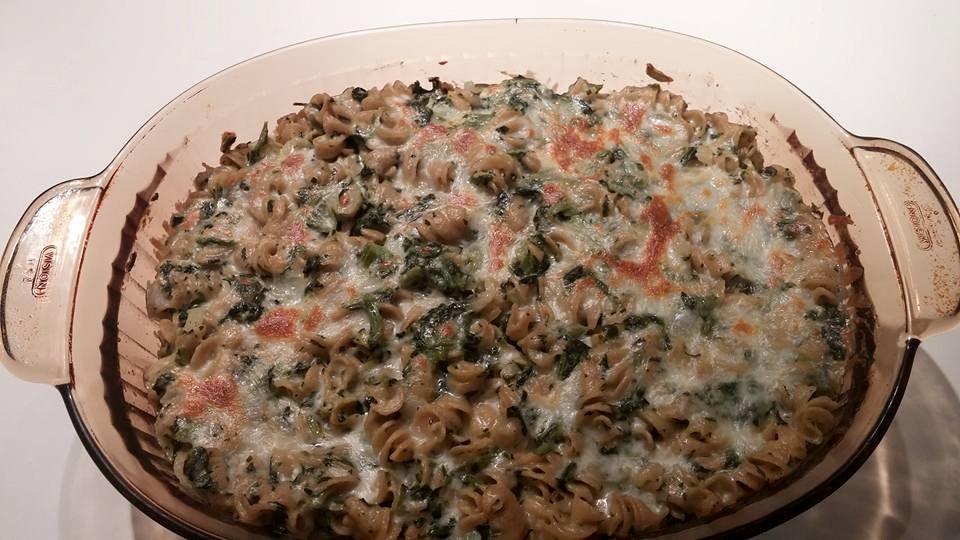
Spinach and Artichoke Mac & Cheese

I love spinach and artichoke dip and I love mac and cheese – so why not put them together for dinner!!
Spinach and Artichoke Mac & Cheese
1 lb. whole wheat pasta (I used rotini)
2 Tablespoons olive oil
1 small onion, chopped
3 cloves garlic, minced
1 10 oz. bag frozen spinach (thawed and drained)
1 12 oz. jar chopped (or quartered) artichoke hearts
1/8 teaspoon nutmeg
1/8 teaspoon black pepper
2 Tablespoons butter
2 Tablespoons whole wheat flour
2 cups milk (I use skim)
1-1/4 cups shredded Asiago cheese
1 cup grated Parmigiano Reggiano cheese
1/4 cup shredded Mozzarella cheese
Preheat the oven to 350° and spray a 9″ x 13″ casserole dish with non stick spray.
Cook the pasta according to the directions on the package (I omit the salt). While the pasta is cooking, place a large saucepan over medium-low heat; add the olive oil and then the onions. Saute the onions for about 10 minutes; until they are soft. Add the garlic and saute for another 2 -3 minutes. Add the spinach and artichokes; season with nutmeg and pepper; mix well. Saute until the veggies are warm and well combined (3 – 4 minutes). Place all into a plate and reserve.
When the pasta is done cooking, drain, put pasta back in the pot and then add this veggie mixture to the pasta; blend well and keep warm while you make the sauce.
Turn the heat up to medium-high and add the butter. When the butter is mostly melted, sprinkle in the flour and, using a wire whisk, mix well. You will have what looks like crumbs in the pan. Let this cook for 2 – 3 minutes, keeping everything moving and letting the pan get fairly hot. Start adding the milk a little at a time, whisking well after each addition and making sure everything is smooth; letting the pan heat back up again before adding the next milk addition (this will help the sauce stay smooth and lump free). Once you have added all of the milk, add in the Asiago and Parmigiano Reggiano and whisk until smooth.
Add the sauce to the pasta/veggie mixture and put it all into the prepared casserole dish. Sprinkle the 1/4 cup of Mozzarella over the top, cover and bake for 20 minutes. Remove the cover, turn on the broiler for about 3 – 4 minutes to brown the top (watch very carefully!!).
Slow Cooker Beef Stew

Slow Cooker Beef Stew
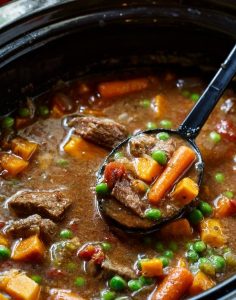
1 lb. lean stew beef
1/4 cup whole wheat flour (plus some more for coating)
3 Tablespoons olive oil
1/2 cup chopped onion
1 Tablespoon chopped garlic
3 Tablespoons tomato paste
4 cups low sodium beef broth
3 bay leaves
1/2 teaspoon ground allspice
1/2 teaspoon thyme
1/4 teaspoon black pepper
2 cups (approximately) chopped carrots (I use baby carrots and cut them in half)
2 cups (approximately) chopped potatoes
1 cup frozen peas
Spray your slow cooker with non-stick cooking spray. Place about 3-4 Tablespoons of whole wheat flour into a zip lock bag; add in a few shakes of black pepper and garlic powder, shake it up. Put all of the stew beef cubes into the bag and shake to coat well. Heat 2 Tablespoons of the oil in a large skillet over medium heat. Add the beef cubes a few at a time to the pan and lightly brown on all sides. When they are brown, remove them and add them to the slow cooker. Once you browned all of the beef add the onion to the same skillet and cook for 2 – 3 minutes (just to very lightly soften them), add garlic and cook for about another 1 minute. Transfer the onion and garlic to the slow cooker with the beef and add in the carrots and potatoes. Add the remaining 1 Tablespoon oil to the skillet (still on medium heat). Add the tomato paste and stir until the oil begins to turn brick-red, about 1 minute. Add the flour and using a wire whisk get it completely incorporated into the paste/oil mixture; cooking for a couple of minutes. Add the beef broth a little at a time, making sure to get each addition completely incorporated before adding more. Once you’ve added all of the broth, add in the bay leaves, thyme, allspice, and pepper; bring to a simmer, whisking all the time, until it is smooth and thickens slightly, about 4 minutes. Pour into the slow cooker and mix everything well. Cover and cook on low for 7 – 8 hours. Just before you are ready to serve; stir in the frozen peas, replace the cover for about 15 minutes.
Delicious!!
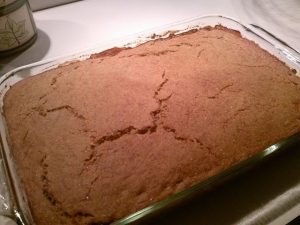
Mexican Shepherd’s Pie

This is a really easy and yummy variation of traditional Shepherd’s Pie using ground turkey, jalapenos, Mexican spices, beans, and corn; topped off with cheesy cornbread instead of mashed potatoes! When I serve it, I like to top it with plain Greek yogurt, shredded cheese, salsa, shredded lettuce, and avocado slices 😉
Mexican Shepherd’s Pie
1-1/2 lbs. ground turkey
1 onion, chopped
3 cloves garlic, minced
2 small jalapenos, minced
1 Tablespoon chili powder
3/4 teaspoon garlic powder
3/4 teaspoon onion powder
1/2 teaspoon crushed red pepper flakes
3/4 teaspoon cayenne pepper
1/2 teaspoon dried oregano
3/4 teaspoon paprika
1 – 1/2 teaspoons ground cumin
1/4 teaspoon black pepper
1 – 15 oz. can black beans, drained
1 – 15 oz. can diced tomatoes, no salt added
1 – 13 oz. can creamed corn, no salt added
1 cup frozen corn
1 – 8 oz. can tomato sauce, no salt added
Cheesy Corn Bread:
1 cup whole grain cornmeal
1 cup whole wheat flour
1 cup shredded cheddar cheese
1 cup skim milk
2 eggs
1/2 cup canola oil
4 teaspoons baking powder
1/8 teaspoon salt
Preheat oven to 450° Spray a 9″ x 13″ pan with non-stick cooking spray.
Brown ground turkey over medium heat, when it’s about 3/4 done; add onion and continue cooking until the turkey is cooked through and the onions are soft. Add garlic and jalapenos to the pan and saute for a few minutes; until the garlic is slightly soft (be careful not to burn the garlic). Add the spices and mix well. Add the beans, corn (both types), tomatoes, and tomato sauce. Mix well.
Combine all cornbread ingredients in a bowl and stir until mostly smooth ( a few lumps are ok).
Pour turkey mixture into prepared pan, top with cornbread. Spread the cornbread evenly over the turkey mixture. Bake for 25 to 30 minutes or until the cornbread is golden brown.
****VARIATION — Using Leftover Tacos!! ****
My “Healthy Tacos” recipe makes a TON of food; if you don’t have an army to feed, you probably have a big pan of left overs after this meal. What to do…. “Taco Pie” is a great option – but so is Mexican Shepard’s Pie. Here are the super simple instructions:
Ingredients:
Leftover Taco Mixture
1 – 15 oz. can black beans, drained (you can also use chick peas as a substitute)
1 – 13 oz. can creamed corn, no salt added
1/3 cup Salsa (any Salsa you have on hand)
Cheesy Corn Bread (recipe above)
If you don’t like corn bread or can’t eat corn, make Cheesy Drop Biscuits:
Ingredients:
2 Cups Whole Wheat Baking Mix (I use Hodgson Mill Insta-Bake Mix – click here)
1 Tablespoon Butter
2/3 Cup Shredded Cheese (any kind you like, I use sharp cheddar)
2 Tablespoons diced jalepenos
1 Cup Skim Milk
Oven temperature should be at 425° and the baking time will be approximately 14 – 18 minutes with this variation.Place baking mix in large bowl, cut in butter using a pastry blender or two knives until the mixture looks like coarse crumbs. Add cheese, jalepenos, and milk; mix well. Drop by large tablespoons over the taco mixture – do not spread, but make them somewhat close together to cover as much of the top as possible.
Preheat oven to 450°; spray a 9″ x 13″ pan with non-stick cooking spray.
Place taco mixture into a large frying pan, add beans, creamed corn, and salsa; mix well over medium heat until heated through. Meanwhile make Cheesy Corn Bread; set aside. Pour heated taco mixture into prepared pan; spread evenly. Top with Cornbread and spread evenly over taco mixture. Bake for 25 to 30 minutes, or until the cornbread is golden brown.
Forward Fold – Tales of a Yoga Trainwreck
For the last several years I’ve been delving further and further into living a healthy lifestyle, one that encompasses wellness through physical fitness and a healthy diet. I do a wide range of physical exercise, everything from P90X to running and hiking, with yoga really moving into the forefront as of late. Over the past six months I’ve been practicing 3 to 5 times a week and have actually set a long-term goal for myself of one day becoming a yoga instructor. As most of my yoga learning has been through DVDs and YouTube videos, the need for a good local instructor seems like the next logical step.
Recently, I took a Vi nyasa yoga class at a local facility and, unfortunately, it was a disaster! My wife and I walked into a fairly full class, maybe 25 people, of which I was one of only two men. After a couple of moments of being seated on our mats, the instructor had us come to our feet, perform a forward bend into downward dog, plank, chaturanga, and then….cobra pose? From cobra pose she instructed us to “fold forward”, at which point I looked up to see what she meant which was apparently to lay face down, nose pressed into mat. I was a bit thrown off, this was my fourth yoga class and the first time I had ever encountered anything like this, I had never even seen this done in any of the dozens of videos I have tried. Okay, maybe she has a few variations. I was willing to give her the benefit of the doubt, but by the third and fourth consecutive time we did this I was beginning to grow a little concerned.
Several times early on in this calss we came to our feet and did several standing back bends, which she didn’t always call by name, sometimes only instructing us to “open and lift the heart”. Between all the cobras and standing back bends in such a short period of time, I was beginning to have a difficult time trusting her. About halfway through the class the really awkward moments began to happen. We had just done warrior one into a twist with our left leg forward, when she instructed us to do the same exact side, again. She caught herself and asked the class “did we just do this side”? Several people in the class spoke up and informed her of this error; she half apologized with a little lighthearted laughter and made the correction. After the second time she made a mistake like this I turned and looked at my wife who gave me a look of “WTF?”. Within the next 10 minutes, she made three of four more mistakes similar to this one, basically forgetting which side of a pose we had just done.
Okay, I can understand making a mistake like this, maybe once in a class, I suppose, even twice. But after the third and fourth time it’s obvious that this instructor is either: a.) very new to yoga instruction, b.) having a very bad day, c.) on drugs, or d.) all of the above.
Moving a little further into this quickly evolving yogic nightmare the instructor asked us to do a standing forward bend, grab our ankles, and then take four baby steps backwards, and then forward. Again, WTF?! A couple of moments later she instructed us to do a forward bend, grab the left ankle with the right hand, right angle with the left hand, and then twist to the left side looking under the left shoulder. This felt very unnatural to me, until the girl next to me spoke up notifying the class (and instructor) that “this only works if the left arm is over the right arm”, to which the teacher agreed. Again, WTF?
A little while later, she instructed us to do crow. A few minutes later, the music stopped playing, and she told us that we could “just do crow again if you’d like”, while she changed the music. Nearing an hour into this “guess which confusing pose we’re going to do next” Yoga disaster, I noticed a couple of students rolling up their mats and leaving, and my wife and I used this opportunity to leave, as well.
After the class, we started dissecting all the problems with this class, which went far beyond just a couple of mistakes about which side of the pose we had just done. With only a few exceptions the class was halfway into a pose before she would actually call it by name, many times not even putting a title with the pose. Because of this, many participants of the class had to keep looking up to see what to do, myself included. She didn’t recommend any modifications, either. Her breathing instructions – inhale, now exhale seemed too close together, didn’t flow well with the movements of the class, and sometimes conflicted with the poses. For instance, when we did tabletop to cat pose she told us to inhale while we were pushing our backs towards the ceiling.
I know that every yoga instructor is going to have their own style, but for a basic Vinyasa flow class we didn’t even do some of the most basic poses like warrior two or three or chair pose, let alone a single balance pose. Because of the way she gave instructions (or lack thereof), proper body alignment was very difficult throughout much of this class. There was no “stack the shoulders”, “square the hips”, “lengthen both sides of the torso”, “press your lower back into the mat”.
While I am fairly new to yoga and have learned primarily through instructional videos, I do have a good understanding of the basics and consider myself a beginning intermediate. This was my fourth yoga class with an actual instructor. My first yoga class was last summer, and a great one. The instructor was spot on, exceptional. Two of the other classes I took, all at different studios, were okay, not as good as my first class, but not terrible. This class was frighteningly bad! I left the class frustrated and feeling like I didn’t even get in a good workout, even though the back of my head and neck ached. I am convinced that I could have walked to the front of that class at any point and done a better job just winging it than this “instructor”.
At one point midway through the class I remember turning to my wife and softly saying “do you want to go?” She shook her head no, let’s stay. Looking back, I realized that if we had left only a short way into this class it would’ve disrupted the energy in the room, it could have thrown the teacher even further off balance and made it even more difficult for those who stayed. But by staying, we did some temporary damage to our bodies, as my wife also had neck and back pain after this class. Aside from the overall lack of flow and commonsense poses, this was no doubt due to the constant looking up required to figure out what the hell was going on. I wonder how many other people at this class had some unnecessary pain and discomfort because of this bad instruction.
How does this happen? Out of my four yoga class experiences I’ve witnessed a wide range in the quality of instruction – one top-notch instructor, two middle of the road instructors (one who was actually reading many of his instructions verbatim from a notebook), and one instructor who had no business leading a class. Although I left this class with a bad taste in my mouth, I did learn some things and was eventually inspired and empowered. I learned that a yoga class can actually be dangerous and can cause injury to its participants. I learned the importance of finding a great instructor, and that; perhaps one should do some research before jumping into a class, cold. The absence of some obvious essentials reinforced the need for instructors to provide great attention to detail in a yoga class. And through this difficult experience I now feel even more inspired to continue my search for a great instructor.
Chinese Duck Sauce

Today is Super Bowl Sunday! After much discussion over the past few weeks we settled on a slightly less than traditional Super Bowl feast — a Chinese Buffet 🙂 I’ll be making (all as healthy as possible…but this is a special occasion so….):
Chicken Fingers – Steak Teriyaki – Teriyaki Chicken Wings – Veggie Fried Rice – Egg Rolls – Duck Sauce – Chinese Gravy
I’ll be posting more photos and recipes later, but for now here is my Duck Sauce recipe. Eric loves duck sauce, but the store bought varieties are basically nothing but high-fructose corn syrup so he challenged me to make a healthy one. It passed the first taste test as I was preparing it and it’s now cooling in the fridge awaiting kick off.
Chinese Duck Sauce
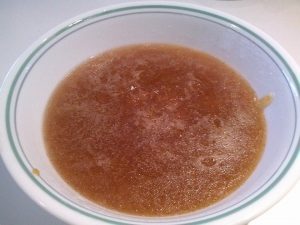
1 cup apricot jam (I used All Fruit)
1 Tablespoon vinegar
1 teaspoon onion powder
1/4 teaspoon ginger powder
1/4 teaspoon allspice
1/8 teaspoon garlic powder
1/8 teaspoon cayenne pepper
1 teaspoon honey (I used Agave)
1/3 cup water (approximately – add slowly until you get a slightly thinner sauce than you want – it will thicken again when it’s cool)
Whisk the ingredients together well in a medium sauce pan. Bring to a boil on low heat; stirring almost constantly. Cool the sauce and store in the refrigerator.
Salmon Scampi
Salmon Scampi

2 Tablespoons olive oil
2 Tablespoons margarine (I use Smart Balance Light)
2 – 6 oz. Salmon filets
1/2 cup onion, chopped
6 cloves garlic, minced
1 teaspoon red pepper flakes
3 leaves fresh basil, chopped
1/2 cup white wine (or you can eliminate the wine and use 2 cups of chicken broth)
1-1/2 cups fat free, low-sodium chicken broth
1 lb. whole wheat spaghetti, cooked according to package directions (no salt)
Heat the olive oil over medium in a skillet, melt in the butter. Add Salmon; season with a little cracked black pepper and a sprinkle of garlic powder. Saute over medium heat and break up the filets as they cook. When the Salmon is about half cooked add onions and continue sauteing until the salmon is almost done and the onions are soft. Now add the garlic, pepper flakes, basil; continue sauteing for another minute or two. Add the wine to deglaze the pan and then add the broth and simmer for 3 – 4 minutes. Pour entire mixture over cooked pasta; mix well. Serve with plenty of grated Parmesan!