Vegetarian
Red Beans and Rice – 171
Red Beans and Rice

2 teaspoons olive oil
1 cup vidalia onion, sliced
3 cloves garlic, minced
2 – 16 oz. cans reduced sodium dark red kidney beans
1/4 teaspoon cumin
1/2 teaspoon chili powder
1/4 teaspoon cayenne pepper
1/4 teaspoon black pepper
1/4 teaspoon crushed red pepper flakes
1 teaspoon Worcestershire sauce
1/4 teaspoon Tabasco sacue
2 links Tofurkey, sliced
2 bags Success brown rice, cooked and drained
Heat olive oil in medium skillet. Saute onion and garlic until soft and lightly browned. Add beans, cumin, chili powder, cayenne, black pepper, red pepper flakes, Worcestershire sauce, and Tabasco sauce. Simmer, on low, for 10 – 15 minutes. Add Tofurkey and simmer another 5 minutes. Stir in brown rice; mix well.

Mediterranean Pizza – 172
I’m going to have to give Eric most of the credit on this one. He is, among other things, the best prep cook on the planet, a premiere sandwich maker, and our reigning pizza king. This pizza yields 8 slices, but I’m going to have to admit that we pretty much split it – with no leftovers. Considering that if you did that with a Pizza Hut cheese only pizza, you’d have double the calories, fat, and sodium….I don’t feel that bad about it 🙂
Mediterranean Pizza

½ red or bell pepper (sliced)
½ cup broccoli florets (chopped)
¼ cup vidalia onion (sliced)
¼ cup baby portabella mushrooms (sliced)
4 – 5 kallamata olives (sliced)
2 – 3 Greek olives (sliced)
3 cloves garlic (minced)
½ cup low-fat shredded mozzarella cheese
¼ cup fat-free shredded mozzarella cheese
1 tablespoon crumbled feta cheese
1 teaspoon dried basil (vary to taste)
1 teaspoon dried oregano (vary to taste)
1 teaspoon extra-virgin olive oil
1 100% whole wheat Boboli pizza crust
Tomato Sauce:
1 eight ounce can no salt tomato sauce
¼ teaspoon each: garlic powder, onion powder, basil, oregano, onion flakes
1/8 teaspoon crushed red pepper flakes
Place a pizza stone* in oven and preheat to 500°. Mix tomato sauce and spices together in a bowl. Drizzle a small amount of extra virgin olive oil on top of pizza crust and spread with a pastry brush or paper towel (a mist spray bottle works well for this also). Dump about two thirds of the sauce on top of the crust and spread with a spoon until entire crust is covered (save rest of sauce for another meal). Evenly spread about 1/3 cup of the low-fat mozzarella cheese on top of the sauce. Don’t worry about completely covering the sauce with cheese at this stage, the rest will go on after the toppings. Evenly spread sliced peppers, onions, broccoli, mushrooms, and olives on top of pizza. Spread the remaining low-fat mozzarella and fat-free mozzarella on top (no tomato sauce should be visible after this stage is complete). Sprinkle the feta cheese, minced garlic, and the oregano and basil evenly across the pizza. Lightly drizzle or spray a small amount of olive oil on top of pizza. Reduce oven temperature to 450°. Using a wooden pizza paddle, place pizza on pizza stone and bake for 12 to 14 minutes. Ovens may vary, cook the cheese and underside of crust is beginning to brown. Remove pizza from oven with pizza paddle and place on a cutting board to let cool for 2 to 3 minutes. Cut pizza into eight slices using a large knife or pizza cutter. Sit back and enjoy the tastiest pizza you’ll ever eat!
*If you don’t have a pizza stone, use a baking pan, with or without aluminum foil, and spray it with a non-stick cooking spray.

Black Bean Croquettes with Creamy Hummus Sauce – 177
I found a recipe on the internet the other day for Black Bean Croquettes; however it only resembles this recipe in that it contains black beans! I decided that the idea was great, but it needed much improving and more healthy ingredients. I will have to warn you that when making this dish, you are going to get fairly skeptical about how it’s going to come out. I know we were…Eric’s reaction when we were forming the “balls” and putting them on the baking sheet was “ok…I’ll try it, but I’m not sure about this…it looks pretty gross at this point”. Yes, he’s right. While it’s in the “design” stage, it’s pretty disgusting looking. So, if you can make it past that, you’ll be really glad you did. These things are delicious and SO good for you. We flattened them slightly after they were on the baking sheet, but it’s really not necessary. It was Eric’s idea, so you can blame him for them not really looking like croquettes 😛
Black Bean Croquettes with Creamy Hummus Sauce

2 – 15 oz. cans black beans, drained and rinsed
1 teaspoon ground cumin
1 can diced tomatoes, no salt added, drained
1/3 cup chopped onion
2 cloves garlic, minced
1 teaspoon chili powder
1 cup frozen corn kernals
1/4 cup egg substitute
3/4 cup fresh whole wheat breadcrumbs
1/4 cup dried whole wheat breadcrumbs
Preheat oven to 425°. Coat a baking sheet with non-fat cooking spray. Place beans into a food processor. In a large bowl, combine next 5 ingredients. Put 1/2 of the tomato mixture into the food processor with the beans and process until smooth. Transfer the bean mixture to the large bowl (which contains the rest of the tomato mixture), add the egg, corn, and the fresh breadcrumbs; mix well. Divide into 12 equal size balls, roll each in in the dried breadcrumbs and place onto the prepared baking sheet. Bake for 25 minutes. Serve with Creamy Hummus Sauce.
Creamy Hummus Sauce
1/2 cup 3 pepper spicy hummus
1 teaspoon olive oil
1 – 1/2 teaspoons lemon juice
1 Tablespoon (approximately) waterCombine all ingredients into a small bowl and whisk until smooth. You may want to add a little more (or less) water depending on your desired consistency. It should be like a creamy ranch dressing consistency.
Recipe = 12 Croquettes
Nutrition info is for one Croquette with 2 Tablespoon of Sauce

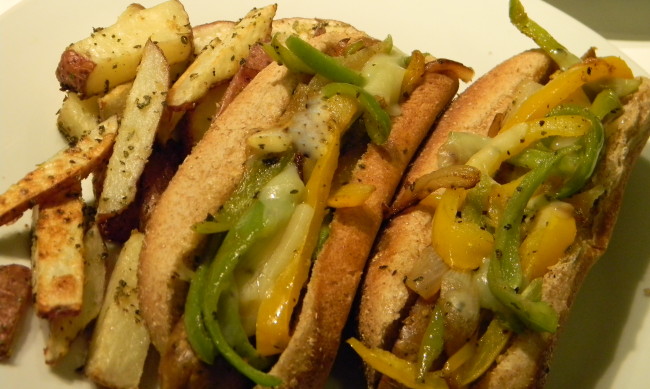
Sausage & Pepper Subs – 179

This is one of those “fun” foods that you think you can’t have anymore because you are trying to “be healthy” or “lose some weight”. Well – no more! It’s fair season (not to mention football season ….. did I ever mention I’m a football fan?); and in my younger (and dumber) days I used to love to get a big, greasy sausage sub at the Rochester Fair. I learned that one of those costs much more than the few dollars they charge you. I always had to pay with a very uncomfortable bloated feeling accompanied by stomach cramps and general nausea followed by the uncontrollable urge to take a nap. But I have found a great alternative to give me the same fun factor without any of the unpleasant side effects. These go great with what we call “Fun Potatoes” (recipe below). I hope you enjoy these as much as we do.
Sausage & Pepper Subs
1/2 package Tofurkey Italian Sausages (2 links)
1 green pepper, sliced into thin strips
1 yellow (or red or orange) pepper, sliced into thin strips
1 onion, sliced into thin strips
1 clove garlic, minced
1 Tablespoon olive oil
1/2 cup fat-free cheddar cheese, shredded
4 100% whole wheat hot dog rolls
Slice each Torukey sausage in half lengthwise; set aside. In large frying pan heat oil over medium-high heat. Add peppers and onion and saute for several minutes (until the peppers start to get soft and the onion is lightly browned). Add the garlic and saute for another 1 -2 minutes. At this point add the sausages to the pan, cut side down. These sausages are pre-cooked, so you will only need to warm and lightly brown them. While the sausages are browning, divide the peppers and onions into four equal piles in the pan. Top each pile with 2 Tablespoons of the cheese and allow to melt. I like to toast the rolls in the pan for a minute or so, if you don’t have a large enough pan, a toaster oven will do the trick. To assemble, add one 1/2 link to each roll and top with the peppers/onion/cheese mixture. Yum…Yum 🙂
Fun Potatoes
3 red potatoes, sliced into “french fries”
1 Tablespoon olive oil
1/4 teaspoon garlic powder
1/4 teaspoon onion powder
1/4 teaspoon basil
1/4 teaspoon oregano
dash of black pepper
Preheat oven to 450°. Spray a baking sheet with non-fat cooking spray. Place all ingredients into a bowl and toss well. Spread in a single layer onto baking sheet. Bake for 15 – 18 minutes.
Vegetarian Shepherd’s Pie – 180

This is one of my favorite meals. It’s one of those comfort foods that taste great on a cold night and makes you feel all warm and fuzzy inside. It reminds me of being a kid when my mother would make Shepherd’s Pie; although hers was ground beef, corn, and mashed potatoes. It was still great, but not exactly the healthiest meal. This vegetarian version is even heartier while being much lower in calories, fat and sodium, but higher in protein and fiber- and amazingly delicious!! Some of you may say “oh but it’s high in carbs”….yes, you are right….GOOD carbs. There is a difference. I’ve also swapped out half of the potatoes in the topping, for rutabagas. Potatoes have about 22 g of carbs in a cup, but rutabagas have only 7. Trust me, try it – you will love it 😀
Vegetarian Shepherd’s Pie

3 potatoes, cut into cubes
3 rutabagas, cut into cubes
1/2 cup onion, chopped
2 cloves garlic, minced
1/4 teaspoon black pepper
1/2 teaspoon basil
1/2 teaspoon thyme
1/2 teaspoon oregano
1/4 teaspoon cayenne pepper
1 – 1/2 cups eggplant, diced
1 – 1/2 cups frozen corn kernels
1 – 15 oz. can low sodium black beans, rinsed and drained
1 – 16 oz. can low sodium kidney beans, rinsed and drained
1 – 16 oz. can low sodium garbanzo beans, rinsed and drained
2 – 8 oz. cans no salt added tomato sauce
2 Tablespoons plain, low fat Greek yogurt
1 Tablespoon chives
1/4 cup low cheddar and/or jack cheese, shredded
Preheat oven to 375°. Spray a 9″ pie plate with non-fat cooking spray; set aside.
In large saucepan, combine potatoes and rutabagas, with enough water to cover. Bring to a boil over high heat. Cook until rutabagas are very soft (the potatoes will be soft before the rutabagas are done).
Meanwhile, in saute pan; cook the onion and garlic in the olive oil over medium heat until the onions are just soft. Add pepper, basil, thyme, oregano, cayenne and eggplant. Continue cooking for 4 – 5 minutes. Add the corn, cook for a minute or so (until the corn is thawed). Add the beans and tomato sauce; mix well. Place mixture into pie plate.
When the potatoes are cooked, drain and return them to the pan. Mash well and then add the yogurt and chives; mix until well blended and smooth. Top with cheese.
Bake for 20 minutes. Increase oven to broil and allow the top to get a nice golden brown (watch carefully).
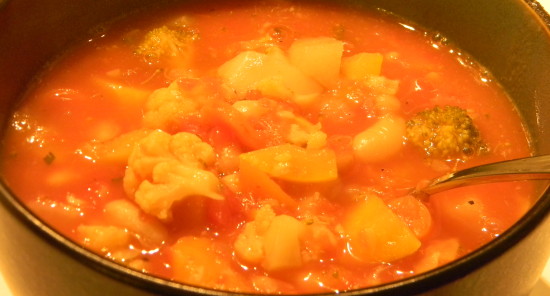
Stone Soup – 184 more to go…

The Story of Stone Soup
Once upon a time, somewhere in post-war Eastern Europe, there was a great famine in which people jealously hoarded whatever food they could find, hiding it even from their friends and neighbors. One day a wandering soldier came into a village and began asking questions as if he planned to stay for the night.
“There’s not a bite to eat in the whole province,” he was told. “Better keep moving on.”
“Oh, I have everything I need,” he said. “In fact, I was thinking of making some stone soup to share with all of you.” He pulled an iron cauldron from his wagon, filled it with water, and built a fire under it. Then, with great ceremony, he drew an ordinary-looking stone from a velvet bag and dropped it into the water.
By now, hearing the rumor of food, most of the villagers had come to the square or watched from their windows. As the soldier sniffed the “broth” and licked his lips in anticipation, hunger began to overcome their skepticism.
“Ahh,” the soldier said to himself rather loudly, “I do like a tasty stone soup. Of course, stone soup with cabbage — that’s hard to beat.”
Soon a villager approached hesitantly, holding a cabbage he’d retrieved from its hiding place, and added it to the pot. “Capital!” cried the soldier. “You know, I once had stone soup with cabbage and a bit of salt beef as well, and it was fit for a king.”
The village butcher managed to find some salt beef . . . and so it went, through potatoes, onions, carrots, mushrooms, and so on, until there was indeed a delicious meal for all. The villagers offered the soldier a great deal of money for the magic stone, but he refused to sell and traveled on the next day. The moral is that by working together, with everyone contributing what they can, a greater good is achieved.
I always loved that story. I was thinking about it the other night when Eric and I were having the daily “what’s for dinner” discussion. It was finally a cool fall-like day here in Tennessee; it had been such a long, hot, humid summer that I thought it was never going to cool down again! I found the story on line and decided – “that’s what’s for dinner!”. We had a fridge full of various veggies from our weekly organic basket and we didn’t want any of it to go to waste. The types of vegetables can be anything that you have on hand, the more variety, the better! I didn’t actually add a stone to the pot, but if you have kids; reading the story and then making the soup together could be a great way to get them to eat some vegetables 😉
Stone Soup
1 Tablespoon olive oil
1 medium onion, chopped
3 cloves garlic, minced
1 cup baby carrots, cut into thirds
1 cup broccoli florets
1 cup cauliflower, cut into bit size pieces
1 cup rutabagas, cut into bite size pieces
1 cup yellow squash, cut into bite size pieces
1/2 teaspoon basil
1/2 teaspoon oregano
1/4 teaspoon thyme
1/4 teaspoon black pepper
1 quart fat-free, low-sodium chicken (or vegetable) broth
2 – 15.5 oz. cans diced tomatoes, no salt added
2 – 15.5 oz. cans great northern beans, rinsed and drained
Fat-free mozzarella cheese
In a large pot, heat the olive oil over medium-high heat, saute the onion for 2 – 3 minutes. Stir in the remaining vegetables; season with basil, oregano, thyme and pepper. Saute for 6 – 8 more minutes; add garlic and saute for another minute. Add in the broth and bring to a boil, cook for approximately 8 minutes (until the veggies are done to your liking). Place the tomatoes (with their juice) into a food processor and process until smooth. Add the tomato puree along with the beans to the soup. Cook for 2 – 3 minutes to allow the flavors to blend and heat the beans. To serve, place about a 1/4 cup of mozzarella in the bottom of a soup bowl and then fill with the soup! Yum 🙂 this also goes great with “Garlic Balls“!
Scrambled Lasagna – 198 to go!

I actually made this on Thursday night. Again we needed a quick meal that would yield some leftovers for a weekend trip with Rhett. Rhett and band played a frat party (!) on Friday night in Troy, Alabama and then an outdoor festival on Lake Barkley in Kuttawa, Kentucky. Since we try to never eat fast food, catering, or basically any food that I don’t make myself…we brought all of our own food (as usual). Fruit and yogurt for breakfasts, whole wheat bread and tuna for lunches and two leftover meals. This week it was Baked Feta Meatballs (from Wednesday night) and this yummy, super quick and easy no-bake lasagna:
Scrambled Lasagna

1 – 16 oz. package of any short cut pasta (I used Rotini)
1 1/2 cups fat free Cottage or Ricotta Cheese
1/2 cup fat free Mozzarella Cheese
1/2 cup low fat Mozzarella Cheese
1/2 cup low fat Parmesan Cheese
1 teaspoon basil
1/2 teaspoon garlic powder
1/2 teaspoon oregano
2 cup pasta sauce (I make a big sauce a couple of times and month and have some in jars in the fridge – you could also use any good jarred sauce. You want to check the ingredients and choose one with the least amount of ingredients and low salt, no HFCS, and olive oil.)
Cook pasta according to package directions (no salt); when the pasta is done drain it into a colander. Into the pan that the pasta just came out of add the Ricotta, Mozzarella and Parmesan cheeses; stir over the heat of the burner (turn the burner off after removing the boiling pasta, the leftover heat will be enough to do the job) until the cheeses are starting to melt. Add the spices and then the pasta sauce; mix until everything is well combined and warmed. Dump the pasta from the colander into the pan and scrambled it all up. There you have it!
The “breadsticks” on the plate in the photo are an Eric creation. They are healthy, quick and delicious!
Eric’s Breadsticks
whole wheat pita rounds
olive oil
dried oregano
garlic powderSpray each pita with olive oil (you can buy a simple mister that works great for this), sprinkle with oregano and garlic powder. Place pita in toaster oven on high; toast to desired crispness. I like mine warm but fairly soft and Eric likes his with more of a “crunch” to it. Have it your way!